# Vue3 项目创建流程
# 1. 新建项目
# 安装 | |
npm install -g @vue/cli | |
# 新建项目 | |
vue create my-project | |
# 项目启动 | |
npm run serve | |
# 打包 | |
npm run build |
打包后的文件,对引用资源注入了预加载(preload/prefetch),启用 PWA 插件时注入 manifest/icon 链接,并且引入 (inlines) webpack runtime /chunk manifest 清单已获得最佳性能。
功能配置
# 2. 功能选择
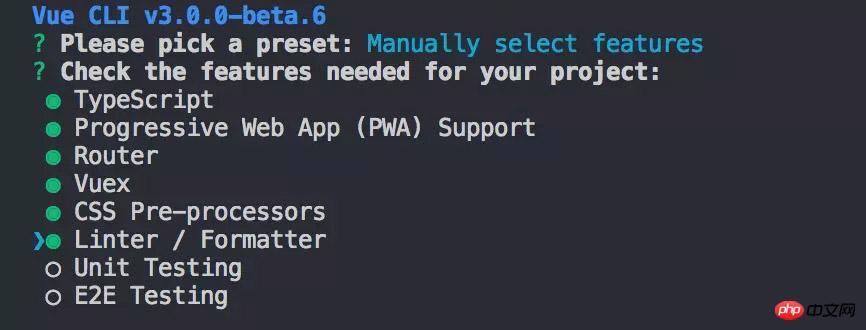
3.0 版本包括默认预设配置 和 用户自定义配置,在用户自定义配置之后,会询问是否保存当前的配置功能为将来的项目配置的预设值,这样下次可直接使用不需要再次配置。
自定义功能配置包括以下功能:
- TypeScript
- Progressive Web App (PWA) Support
- Router
- Vuex
- CSS Pre-processors
- Linter / Formatter
- Unit Testing
- E2E Testing
可以根据项目大小和功能体验配置不同的功能,空格键 选中 / 反选,按 a 键 全选 / 全不选,按 i 键反选已选择项, 上下键 上下移动选择。
# 3. 功能细节配置
在选择功能后,会询问更细节的配置,
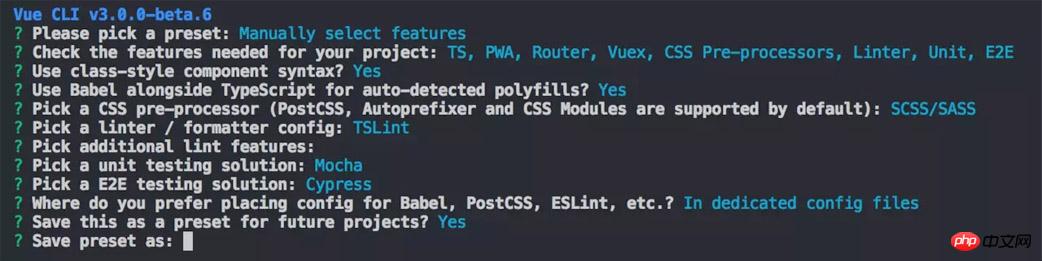
TypeScript:
是否使用 class 风格的组件语法:Use class-style component syntax?
是否使用 babel 做转义:Use Babel alongside TypeScript for auto-detected polyfills?
CSS Pre-processors:
选择 CSS 预处理类型:Pick a CSS pre-processor
Linter / Formatter
选择 Linter / Formatter 规范类型:Pick a linter /formatter config
选择 lint 方式,保存时检查 / 提交时检查:Pick additional lint features
Testing
选择 Unit 测试方式
选择 E2E 测试方式
选择 Babel, PostCSS, ESLint 等自定义配置的存放位置 Where do you prefer placing config for Babel, PostCSS, ESLint, etc.?
# 4.vue.config.js 自定义配置
# 1.vue.config.js 完整默认配置
module.exports = { | |
// 基本路径 | |
baseUrl: '/', | |
// 输出文件目录 | |
outputDir: 'dist', | |
//eslint-loader 是否在保存的时候检查 | |
lintOnSave: true, | |
// use the full build with in-browser compiler? | |
// https://vuejs.org/v2/guide/installation.html#Runtime-Compiler-vs-Runtime-only | |
compiler: false, | |
//webpack 配置 | |
// see https://github.com/vuejs/vue-cli/blob/dev/docs/webpack.md | |
chainWebpack: () => {}, | |
configureWebpack: () => {}, | |
//vue-loader 配置项 | |
// https://vue-loader.vuejs.org/en/options.html | |
vueLoader: {}, | |
// 生产环境是否生成 sourceMap 文件 | |
productionSourceMap: true, | |
//css 相关配置 | |
css: { | |
// 是否使用 css 分离插件 ExtractTextPlugin | |
extract: true, | |
// 开启 CSS source maps? | |
sourceMap: false, | |
//css 预设器配置项 | |
loaderOptions: {}, | |
// 启用 CSS modules for all css /pre-processor files. | |
modules: false | |
}, | |
// use thread-loader for babel & TS in production build | |
// enabled by default if the machine has more than 1 cores | |
parallel: require('os').cpus().length > 1, | |
// 是否启用 dll | |
// See https://github.com/vuejs/vue-cli/blob/dev/docs/cli-service.md#dll-mode | |
dll: false, | |
// PWA 插件相关配置 | |
// see https://github.com/vuejs/vue-cli/tree/dev/packages/%40vue/cli-plugin-pwa | |
pwa: {}, | |
//webpack-dev-server 相关配置 | |
devServer: { | |
open: process.platform === 'darwin', | |
host: '0.0.0.0', | |
port: 8080, | |
https: false, | |
hotOnly: false, | |
proxy: null, // 设置代理 | |
before: app => {} | |
}, | |
// 第三方插件配置 | |
pluginOptions: { | |
// ... | |
} | |
} |
# 2. 设置代理
# string | |
module.exports = { | |
devServer: { | |
proxy: '<url>' | |
} | |
} | |
# Object | |
module.exports = { | |
devServer: { | |
proxy: { | |
'/api': { | |
target: '<url>', | |
ws: true, | |
changeOrigin: true | |
}, | |
'/foo': { | |
target: '<other_url>' | |
} | |
} | |
} | |
} |
# 3. 启用 dll
启用 dll 后,我们的动态库文件每次打包生成的 vendor 的 [chunkhash] 值就会一样,其值可以是 true/false, 也可以制定特定的代码库。
module.exports = { | |
dll: true | |
} | |
module.exports = { | |
dll: [ | |
'dep-a', | |
'dep-b/some/nested/file.js' | |
] | |
} |
# 4. 静态资源路径
相对路径
- 静态资源路径以 @ 开头代表 <projectRoot>/src
- 静态资源路径以~开头,可以引入 node modules 内的资源
public 文件夹里的静态资源引用
# 在 public/index.html中引用静态资源 | |
<%= webpackConfig.output.publicPath %> | |
<link rel="shortcut icon" href="<%= webpackConfig.output.publicPath %>favicon.ico" rel="external nofollow" > | |
# vue templates中,需要在data中定义baseUrl | |
<template> | |
<img :src="`${baseUrl}my-image.png`"> | |
</template> | |
<script> | |
data () { | |
return { | |
baseUrl: process.env.BASE_URL | |
} | |
} | |
</script> |
# 5.webpack 配置修改
用 webpack-chain 修改 webpack 相关配置,强烈建议先熟悉 webpack-chain 和 vue-cli 源码,以便更好地理解这个选项的配置项。
对模块处理配置
// vue.config.js | |
module.exports = { | |
chainWebpack: config => { | |
config.module | |
.rule('js') | |
.include | |
.add(/some-module-to-transpile/) // 要处理的模块 | |
} | |
} |
修改 webpack Loader 配置
// vue.config.js | |
module.exports = { | |
chainWebpack: config => { | |
config.module | |
.rule('scss') | |
.use('sass-loader') | |
.tap(options => | |
merge(options, { | |
includePaths: [path.resolve(dirname, 'node_modules')], | |
}) | |
) | |
} | |
} |
修改 webpack Plugin 配置
// vue.config.js | |
module.exports = { | |
chainWebpack: config => { | |
config | |
.plugin('html') | |
.tap(args => { | |
return [/* new args to pass to html-webpack-plugin's constructor */] | |
}) | |
} | |
} |
eg: 在本次项目较小,只对 uglifyjs 进行了少量的修改,后期如果还有配置上优化会继续添加。
chainWebpack: config => { | |
if (process.env.NODE_ENV === 'production') { | |
config | |
.plugin('uglify') | |
.tap(([options]) =>{ | |
// 去除 console.log | |
return [Object.assign(options, { | |
uglifyOptions: { compress: { | |
drop_console : true, | |
pure_funcs: ['console.log'] | |
}} | |
})] | |
}) | |
} | |
} |
# 6. 全局变量的设置
在项目根目录创建以下项目:
.env # 在所有环节中执行 | |
.env.local # 在所有环境中执行,git会ignored | |
.env.[mode] # 只在特定环境执行( [mode] 可以是 "development", "production" or "test" ) | |
.env.[mode].local # 在特定环境执行, git会ignored | |
.env.development # 只在生产环境执行 | |
.env.production # 只在开发环境执行 |
在文件里配置键值对:
# 键名须以VUE_APP开头 | |
VUE_APP_SECRET=secret |
在项目中访问:
console.log(process.env.VUE_APP_SECRET) |